The Scotch Egg was invented in a pub in London, and it was an intriguing, if crude, concept. A hard boiled egg wrapped in sausage, breaded and fried or baked to a crisp. But hard boiled eggs are truly one of the worst inventions of mankind. Yes, they are a convenient and nutritiously dense snack. But they require cooking eggs at far too high a temperature to result in something truly delicious. Egg proteins begin to coagulate (ie “cook”) at around 145F, so when we boil them in 220F water, they overcook, resulting in a rubbery white, a chalky yolk, and all too often, an ugly and sulfrous green ring around the yolk.
Enter the immersion circulator, or controlled temperature water bath. By cooking eggs at EXACTLY the perfect temperature (ie, around 145F or 63C) for an extended period of time, you end up with an egg that is truly exquisite, even by itself:
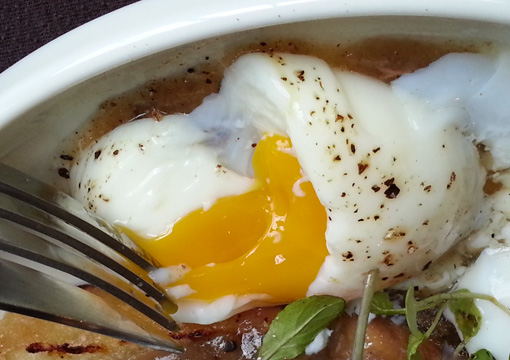
The white and the yolk are the EXACT same texture…silky and custard-like. Nothing like a poached egg, and a universe away from a soft- or hard-boiled egg. But how, I thought, can I implement this so-called 63 Degree Egg inside a Scotch Egg, because it’s so damn delicate. Well, my first hunch was to freeze it solid, so that it could be wrapped in sausage without breaking it. I was worried that the final texture might be affected by the freeze, but it turns out that it doesn’t change it much at all. I did, however, discover the cooking the egg at 147F/64C resulted in a slightly firmer egg that didn’t collapse under the weight of the sausage after cooking. So the final egg texture is a bit firmer than the egg you see above, but still delicate and luscious.
To start, you need to make some 64 Degree Eggs! At FRANK, we use an immersion circulator, the tool for “sous vide” cooking, to cook our eggs, which makes it very easy. But most home cooks don’t have one of these laying around (they are expensive, but getting cheaper all the time…PolyScience has a new entry-level model called the Discovery for $299, or the unique model called Sansair that was invented by famous food blogger Seattle Food Geek who crowd-sourced funds to begin manufacturing his homemade model, and is now selling them for $199. You can also build your own for about $75 using his free plans, which you can find here.) For hen eggs, cook at 64C for 60 minutes. (At FRANK we served guinea eggs in this application, which are smaller than hen eggs but larger than quail eggs, and we cooked them for 45 minutes.)
If you don’t have an immersion circulator…all is not lost! You can make these sous vide eggs on your stovetop, it just takes a little time and patience. Place your eggs in a pot, cover with hot water, and insert a kitchen thermometer. Bring the water to 147 degrees over medium heat. Then turn down the heat and stand there, watching the thermometer. Have a pot of simmering water nearby, as well as a pot of ice water. If the egg bath temp starts to climb above 147, turn down the heat and add a spoon or two of ice water to regulate the temp. If the temp drops too far, add a few spoons of the simmering water. You’ll have to stand there for an hour babysitting the water bath, but you can cook several dozen eggs at a time, and whatever you don’t use for Scotch Eggs, put the rest back in the fridge. They’ll keep for weeks because they’re fully pasteurized and cooked. Just warm them in hot tap water before serving, and crack them right onto the plate!
Once your sous vide eggs are cooked, cool them in a cold water bath. Then place them back in the carton and put them in the freezer. Don’t worry if some of the shells have cracked a bit, especially when you chill them. That happens, it’s no big deal. Freeze the eggs solid for several hours.
When you’re ready to finish the eggs, have everything prepped before you remove them from the freezer:
-A bowl of flour
-A pan of panko bread crumbs
-Your sausage of choice, pressed out into 2 patties per egg, just slightly larger than the footprint of the egg, so you can press the 2 patties around the egg to encase it in sausage. At FRANK we use a housemade venison sausage…feel free to make your own sausage with any ground meat, ground pork fat, veggies, and spices.
-A deep fryer or heavy pot of oil (I use canola) heated to 300F
When you’re ready to assemble and cook, remove an egg from the freezer, give it a quick run under hot tap water, then bang it all over to crack the shell. A nice squeeze will generally shoot the frozen egg cleanly out of the shell, but make sure you remove any tiny shell bits left on the surface.
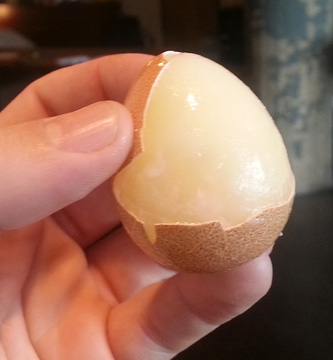 Drop the frozen egg into the bowl of flour and get it coated all over, then shake off the excess:
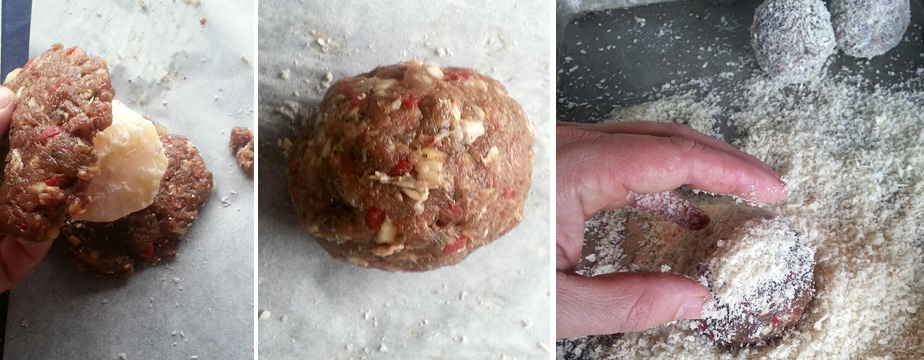
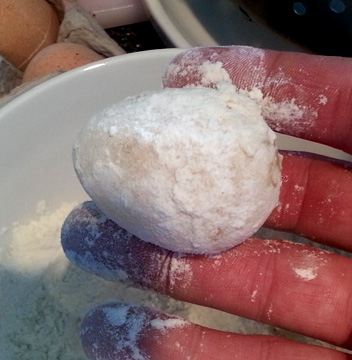 Now place the floured egg onto a sausage patty, and place another patty on top. Seal the edges of the sausage together as best as you can, then roll the egg firmly between your palms to smooth and firm the sausage layer. Then set the egg into the bread crumbs and gently press them all over:
Once you have a few of these assembled, gently place them into the 300F oil and fry for exactly 3 minutes and 30 seconds. This will cook the sausage through, lightly brown the bread crumbs, but not overcook the egg. You WILL occasionally see the sausage tearing apart at the seam, and then the egg white will come in direct contact with the hot oil, resulting in a bulging, unattractive egg. So plan to “lose” about 10-20% of your eggs to this if you’re wanting to present something perfect. Those aren’t lost, of course, you can eat them yourself. And if your guests aren’t picky, just place the prettiest side of the eggs upright for presentation. But if you need it to be perfect, plan on making a few more eggs than you need. Repeat until all your eggs are formed and fried:
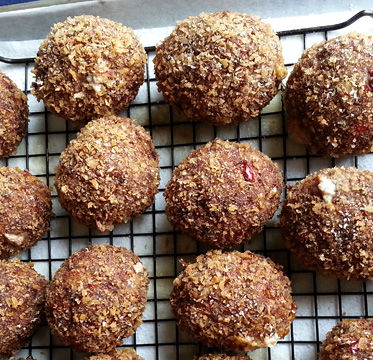 Keep the eggs on a cooling rack suspended over a sheet pan. But remember, the eggs inside are still frozen. The residual heat from the fry will gently thaw them, but you need to let them sit at room temp for a couple of hours to let that process happen fully. Before serving, preheat your oven to 300F. Place the eggs (still on the cooling rack above the pan) into the oven for 10 minutes to warm on the middle rack, then turn your broiler on low and watch those eggs like a hawk. When you begin to see some sizzling around the bread crumbs, pull the eggs and serve them immediately.
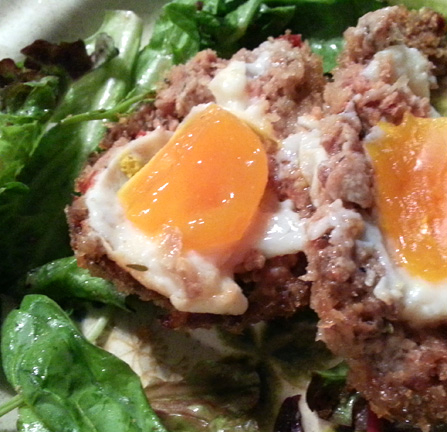
Your guests will be shocked at the amazing levels of texture and flavor in this egg:

Leave a Reply
You must be logged in to post a comment.